Every day, Addison’s nursery gets a little more fixed up with big and little details. I pretty much am really picky when it comes to finding things in stores to decorate her room, so I’ve found myself starting little projects myself, or have commissioned custom projects. I’d been looking on Etsy for a set of baby closet dividers, but nothing really caught my eye. I wanted them to match Addison’s room, and not be pricey. I didn’t really find what I was looking for, and then I saw my friend, Laura, had made her own! I asked her how she made hers, and I was off to Hobby Lobby! I made a few changes than she did, but I think these easy baby closet dividers worked out well!
For this project, you’ll need:
6 wooden O’s
1 package of scrapbook stickers that include numbers and letters
3 pieces of 8.5×11″ scrapbook paper, cut in half
Rubber cement glue (or matte mod podge)
Exacto knife
Rubber cutting mat
Painter’s mask (optional, but important if you’re pregnant!)

Directions:
Disclaimer: Please work on this craft in a well-ventilated area. If you’re pregnant, I highly recommend wearing a painter’s mask because the fumes from the rubber cement glue and mod podge can be very strong.
Step 1: Flip your scrapbook paper
upside down onto your rubber cutting mat and place your wooden O on top. You’ll want to work with 1 sheet of paper at a time, so you don’t accidentally have one slip underneath. Trace your wooden O with the Exacto knife, making sure that you don’t move your letter O at all as you trace. Take the wooden O off once it’s traced, and punch out your paper. If you need to go over the O in certain spots with your knife, do this carefully so you don’t rip the paper.
Step 2: Brush a thin layer of rubber cement glue onto your letter O, making sure you specifically pay attention to the edges. Carefully place the paper on top and smooth down to ensure your paper will seal well to the letter.
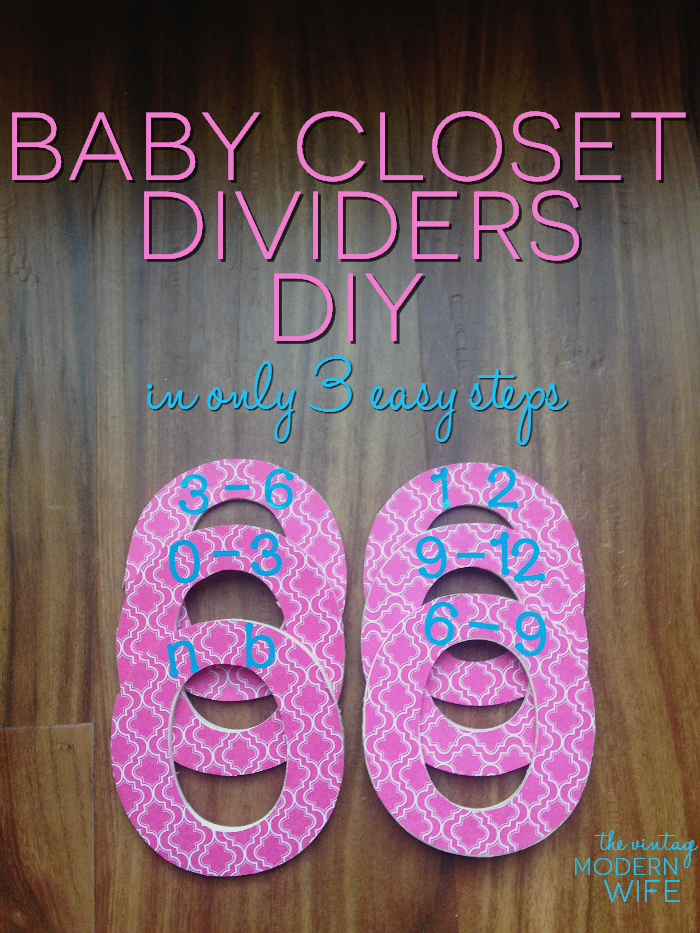
Step 3: Use your stickers to put the clothing sizes you need. I needed 6 rings so I made NB (newborn), 0-3 months, 3-6 months, 6-9 months, 9-12 months, and 12 months +. Make sure your letters and numbers are not coming off of your paper, otherwise they’ll rip or peel off.
Step 4 (optional): If you want to seal your baby closet dividers so they last an extra long time, use a paint brush and thinly apply matte mod podge over the entire front of your dividers, paying close attention to the edges.


Ooo What a great idea!! My sister is pregnant and she would love these. I guess I will have to get making them!
Thanks for the tutorial! I never did make any or buy any for Elyse because they were a little pricey! This definitely is a cheap DIY!
Lauren recently posted…Insta-Friday
What a darling DIY! This is definitely going to help you keep the closet organized. She’ll be here before you know it! XO
Ruthie & Rose recently posted…{ Go with the Flow }
It’s very trouble-free to find out any topic on web as compared
to books, as I found this article at this website.
hermes エルメス 超バーキン recently posted…hermes エルメス 超バーキン
Hi, after reading this amazing paragraph i am as well cheerful to
share my knowledge here with colleagues.
assisted living communities recently posted…assisted living communities
It’s actually a great and helpful piece of info.
I’m happy that you just shared this helpful information with us.
Please keep us up to date like this. Thanks for sharing.
Peg perego 12 volt battery Charger recently posted…Peg perego 12 volt battery Charger
I’m soooo gonna try this! Any ideas on how to hang them on a non-removable closet dowel? Ours are built into the closet. I may have to cut the “O” somehow just to hang them on. Anyhow, great idea and pretty job!! =)